Archive
Google Recipe View : Let Our Search To Be More Personal And Productive
Every time Google is coming with something more innovative and users friendly ideas and recipe view is the one of them.Google has added a new feature Recipe View which will help the users to narrow down the search results and get the desired information which they needed.
So far whenever we needed some cooking ideas or recipes from the internet we of course search in a Google or You tube.For an example we wanted to cook Indian spicy non vegetarian curry like spicy chicken curry,we used to type in the Google search “Spicy Chicken Curry recipes” and as a search result there would be many sites displayed from where we can learn how to cook spicy chicken curry.But if we want less calories in our food or less time consuming then what to do? Because normally they wont tell you how much calories they have in that recipes or how much time will that take in preparation,or Sometimes you don’t want to add some ingredients in some recipes but they have added up.So how to customize your recipes?
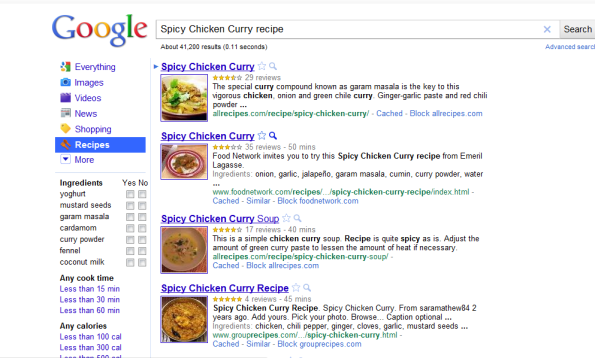
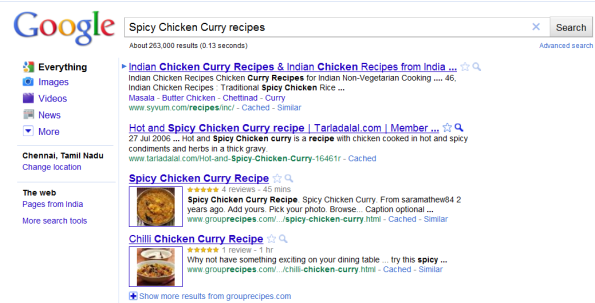 Filtered Google Searched Results without Recipe View
Now Google has given us a new feature in the search engine called “Recipe View” now we can filter or customize our search result with our requirements.
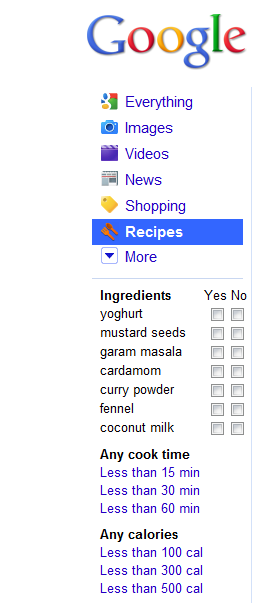 To experience the Google recipe view search impact just go to http://www.google.com/landing/recipes/ type in the search for recipe or ingredient box(ie,cauliflower,chicken,Apple) and hit search and you will find left hand side under Recipes “Ingredients”,”Any cook time” and “Any calories” with options to select.Now you can narrow down or customize your recipes according to your requirements.
So here is the search result which will you get.This result is more refined and perfect with the rich snippets markup.This is really awesome – Thanks to Google!!!!. By the way Recipe View feature is available for US and Japan only according to Google Blog gradually this will be rolling out in other countries also.
Top 5 Mozilla Firefox Add-ons[Extensions]
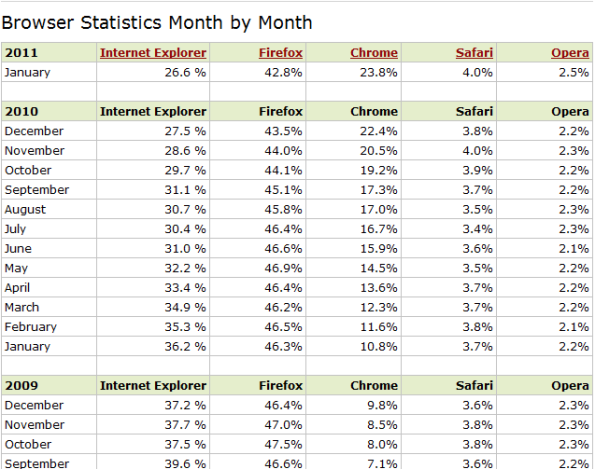
As everyone knows mozilla firefox is a safest and fastest browser in all the browser categories.Here is the statistics for usages in browser by the users in 2009 , 2010 and 2011 till now.
Source:w3schools.com
There are tons of addons available on the net for mozilla firefox which can improvise the functionality of the browser.These extensions are free to download as well.As there are lots of addons available, its always very hard to choose which is the best for you.Though its completely depends on the users choice and needs they can select one or more and add into their browser but here is a snap shot on the basis of statistics given in the site on Weekly reviewed,popularity and downloads.
1. Adblock Plus
3. NoScript
4. FlashGot
5. Greasemonkey
These are the top 5 add-ons which i got it from http://addons.mozilla.org and sharing with you.There are other plenty of extensions available for us to make our web experience better and smarter.
Let us know which add-ons did you like the most?
NetSetMan 3.2.1 :A Smart Network Setting Manager
What is NetSetMan?
Well this is a 2383kb software (which is not so big file) but reduces your more time and effort in order to configure same network settings multiple times on your computer.This is a tiny and smart network setting manager which can configure and save 6 different network profile at the same time.
How it Works?
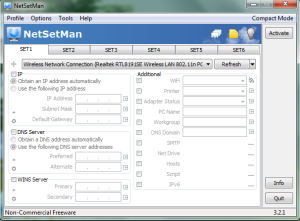
Once you download it from the website and install in your computer-with one click Smart utility window will pop-up.
Here you can see 6 tabs on the top the window where we can create 6 different profiles(In the non commercial version there are few limitation) according to your need.All the setting will be automatically saved in the separate file(settings.ini).
Network setting manager will automatically finds out all the LAN and WAN connection which can be seen dropdown menu.So now we can configure the LAN/WAN and save the profile.
WiFi Management:
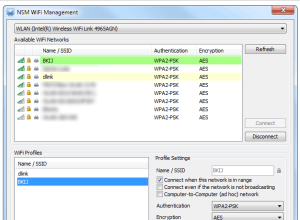
Like LAN we do configure wireless through WiFi management utility.First you need to select the WLAN adapter from the dropdown menu.Then on the top of the Network Setting Manager of NetSetMan Click->Tools->WiFi Management
Now we can refresh and select the network if any security is enabled feed the Key in the appropriate key box and save the settings.Here make sure Wireless Zero connection in XP and WLAN autoconfig in Vista and Win 7 is running.
There are lot more feature you can find in commercial version of NetSetMan.Overall you are going to love this software.
Supported Operating System: Windows 2000,2003,XP,VISTA and Win 7(32bit and 64bit)
Download it Free from here
List of Safe and Virus Free Websites For Crack and Keygen
There are tons of websites on the net who offers downloading the crack or serial key for any software but most of them are overloaded with malicious agents,spam and viruses.I am sure many of you have been going through the many painful hours to removes those viruses which has been affected in your system while downloading the cracks from those websites(for sure you took an oath you never download any crack or serial keys henceforth 😉 ).
Yes,blindly we should not believe those sites which came on the first page as a results of google search.
How to download any Crack or Keygen for your software which you wanted to –
1)First thing you should have a up-to-date Anti virus and Spy-ware running in your computer.
2)Try using Mozilla Firefox as a browser for downloading such cracks or Keygen.If you don’t have on your system please download it from here
3)This is advisable to use two add-ons No script and Ad block Plus for better security purpose .
Here is the lists of safe and virus free websites :
If you guys has to add up more safe and clean Crack/ Keygen sites in this list please feel free to share with us.
SnagIt – Screen capture never been easier
SnagIt is a screenshot application that functions mostly under Windows platform. With SnagIt you would be able to capture an image, video, text and web. This application is created by TechSmith and was launched in 1990.
SnagIt replaces the basic Print Screen function in a Windows platform with a few additional features. You can also change the captured image to .jpg/ .gif/ .png/ .swf etc. from the drop down list provided in the SnagIt editor. You can also specify the destination folder where the captured image needs to be stored. This tip is only for the 1st time when you use SnagIt, after-which once you hit the “Print Screen” button on your keyboard / click the “Capture” button in SnagIt, the rest of it is taken care of automatically.
It’s never been easier to take a screenshot as it’s just a click away. Let me brief you more on the features that SnagIt offers and its capabilities.
Basic Profiles
SnagIt usually comes with some basic capture profiles. You can select any one of those before you hit the “Print Screen” / “Capture” button. The various profiles listed under the “Basic capture profiles” category is,
Capturing any specific region
Capturing a window
Capturing Full screen
Capturing scrolling window (without web links)
Capturing scrolling window (with web links)
Under “Profile settings” which is found in the bottom pane, once you open SnagIt, you may also select the “Input” (meaning, screen capture of either window/full screen/specific region), “Output” (selecting the captured image to be either printed/ emailed/ copied in clipboard), “Effects” (you can either trim/ add borders/ add caption etc.)
Features of SnagIt:
Image Capture:
This feature enables the capturing of digital image of anything you see on your screen. The capture image can be edited, printed, saved as a standard image file, can be copied to another application like MS Word, MS PowerPoint etc. or also sent as an attachment in the mail.
Text Capture:
This feature will capture editable text from the screen instead of a graphical image. This not only captures the text from a word document or a web-page but also, grab text from areas that don’t offer copy and paste (Eg: My Documents list of files, menu text, status pane information, messages, tool-tips, etc.)
Video Capture:
This feature enables any on-screen activity of your Windows desktop and saves the video as an AVI file. Double click on the SnagIt icon in system tray. You may also choose a specific basic profile available and select the “Video Capture” from the small drop-down arrow next to the “Capture” button.
Web Capture:
This feature pulls every image from any web page you choose and stores them into a folder to view, save, manipulate or even print.
Let me guide all the first timers with the step by step process on how to perform a screen capture using SnagIt. Unlike the primitive version we use to capture screenshot through MSPaint, SnagIt allows you to capture screenshots/text /video /web content in 1 go.
1. Once SnagIt is installed in the computer, it would appear in the system tray
2. Double click on the SnagIt icon in system tray
3. Now, you may get to choose any one of the basic profiles (like the ones I have mentioned earlier)
4. Upon choosing the profile (window/ full screen/ specific region), click on the “Capture” button. Assuming, that we have selected the “specific region” profile
5. You may also select the various capture modes (Image, Text, Video, Web) from the small drop-down arrow next to the “Capture” button. Assume that we have selected the “Image Capture” here
6. Now, once you select the “Capture” button available in SnagIt, left-click and hold the mouse button as you drag to select a specific region
7. Once you have selected the region to be captured, release the mouse button
8. This would capture that specific region and paste it automatically in the SnagIt Capture Preview window
9. You can either add caption/ border/ trim the screen shot and select the format to which the image needs to be saved (from the drop-down list) available and click “Done”
10. This would prompt you to save it in a specified location of your choice, give the destination folder and it’s done.
Follow the link: http://www.techsmith.com/download/snagit to get a 30 day free-trial of this application. Use it and feel the power of a single click snapshot.
-Avinash
